Search Knowledge Base
How To Create A Case
Creating a Case
A Case represents an issue experienced by one of your Contacts. Case Work is the set of features within the application that supports the management and tracking of these issues for the community that you represent.
There are two main ways to navigate to the Case Work application once you are logged in:
- Select the Case Work icon from the top-most menu. You may do this at any point while you are logged in.
- Select one of the Case Work options from the Home screen.
To add a Case from within the Case Work application, use the following steps:
Step 1: Open the Create Case View
Click on the Create icon in the left-hand menu. A form to add the new Case will appear.
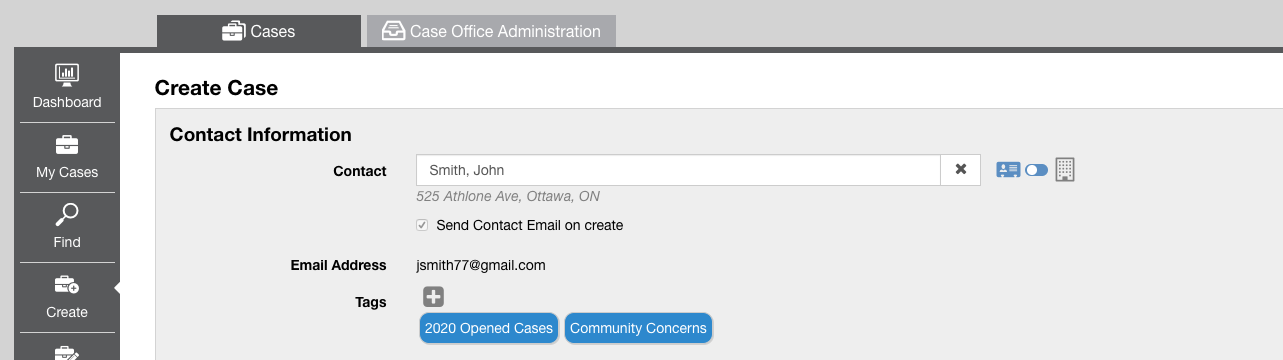
Step 2: Provide the Contact Information.
Every Case must have a Contact associated with it, normally the person who originally reported the issue.

Contact Type – Use the toggle to the right of the contact name to select the Contact Type for which the Case is being created. This can be an individual contact or an organization.
Contact – Choose the Contact. Clicking the Contact field will cause a pop-up to appear.
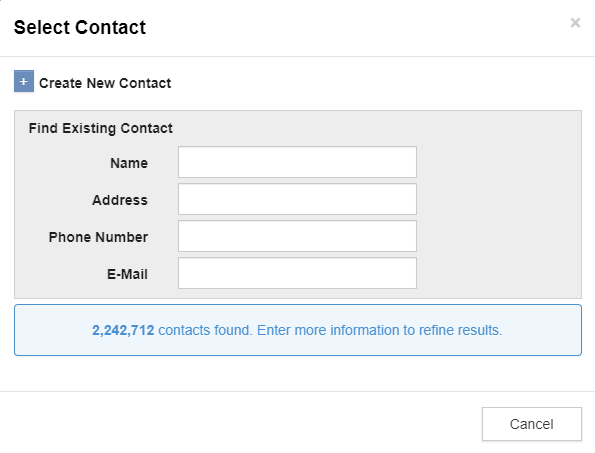
From here, you may either Create a new Contact or Search for an existing one.
- To Create a new Contact, click the ‘+’ button on the top-left corner of the pop-up. Note that you will be required to fill in all the information a regular Contact requires, i.e. a first and last name, and either a phone number, email address, or a civic address.
- To Search for an existing Contact, fill in the relevant search parameters, then click on the desired Contact from the results that are presented.
Send Contact Email on create – If your Case Office Administrator has enabled it, you have the option to send the Contact an email once the Case is created. If the Contact does not have an email or has been marked as Do Not Contact, you will receive a notification that this is the case.
If you are a Case Office Administrator, see the Case Work Administration Guide to understand how to set up the sending of Contact emails.
You may also add Tags to the Contact or Organization by selecting the + button and then selecting the desired Tags from the drop-down Tag Picker. To remove a Tag, click the x in the right hand side of the Tag.

Step 3: Case Information
Details of the Case are entered in this section including the date, location, and description of the issue.
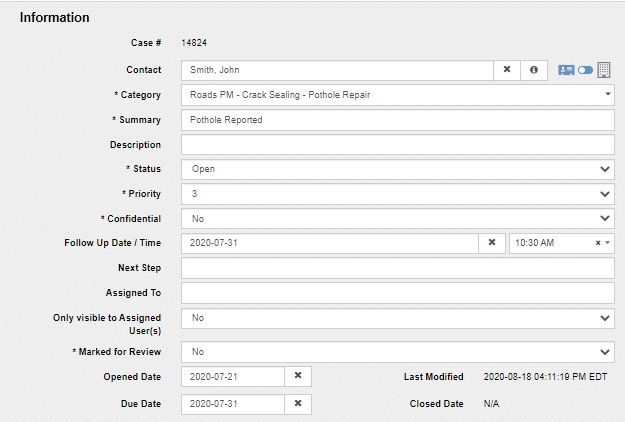
- Category
Categorization of the Case based on the options defined by your Domain Administrator or Case Office Administrator. Note that the choice of Category may change the specifics of the Intake Note if your Case Office Administrator has overridden the Category’s Default Intake Template. - Summary & Description
The Summary and Description of the issue to be tracked. - Status
Open for Active Cases, or Closed for Cases that have been resolved or shelved indefinitely.- If your Case Office Administrator has configured Substatus options, you’ll have the option or may even be required to choose a Substatus as the Status.
- If your Case Office Administrator has enabled the capability, you’ll have the option to send an automated Email to the Contact upon closing the Case. If you are a Case Office Administrator and wish to set this up, see the Case Work Administration.
- Priority
A priority level to for the Case – from 1 to 5 (1 being the most urgent). - Confidential
Confidential Cases can only be viewed by Case Office Administrators and Case Office Staff. They cannot be viewed by Office Basic users. - Follow Up Date/ Time
The date and time in which the case is set for a follow-up. - Next Step
A summary of the action required to move the Case forward. - Custom Field(s)
Your Case Office Administrator may have created Custom Fields to be completed as labeled. - Assigned To
Allows you to assign the Case to anyone in your Case Office. - Only visible to Assigned User(s)
By default, a Case is visible to all staff in the Case Office. You can choose to only make the Case visible to assigned users and all Case Office Administrators. - Marked for Review
This is a flag that allows the Case to be included in a list/report of Cases that are Marked for Review. This can be very useful if the Case Office Manager wants to get a list of the cases that require a review. - Opened Date
By default, this is set to today’s date. However, you can override this if the Case needs to be tracked to a different date. - Location Description
By default, the map will display the address of the contact associated with the case if that contact has an address listed. You can change the location if the case needs to be tracked in a different place by clicking the Lookup button under Location Description. A text box will Appear. The location you type into this box will then automatically appear on the map. To change the location back to the contact’s address, click the Contact button under Location Description. The text box located directly below the map is meant for descriptive notes about the location. - Due Date
The date by which the Case should be completed. There are several Reports available that will provide statistics related to Due Dates, for example the number of Cases that have met or exceeded the target Due Date. For the instructions on how to create these Reports see How To Create Reports.
Using ArcGIS Layers

If your Case Office Administrator has configured the option for Esri ArcGIS integration, you will be able to see ArcGIS Layers on the map. To do so:
- Select the Globe icon in the bottom right corner of the map (1).
- Then select which Layers you would like to add to the map from the pop-up that is presented (2).
- You can hover over the pins on the map to see the detailed attributes of the tracked assets (3).
- You can associate the tracked asset to the current Case Details simply by selecting a pin. It will appear as an Asset in the Case Details (4).
Step 4: Notes and Attachments
Notes
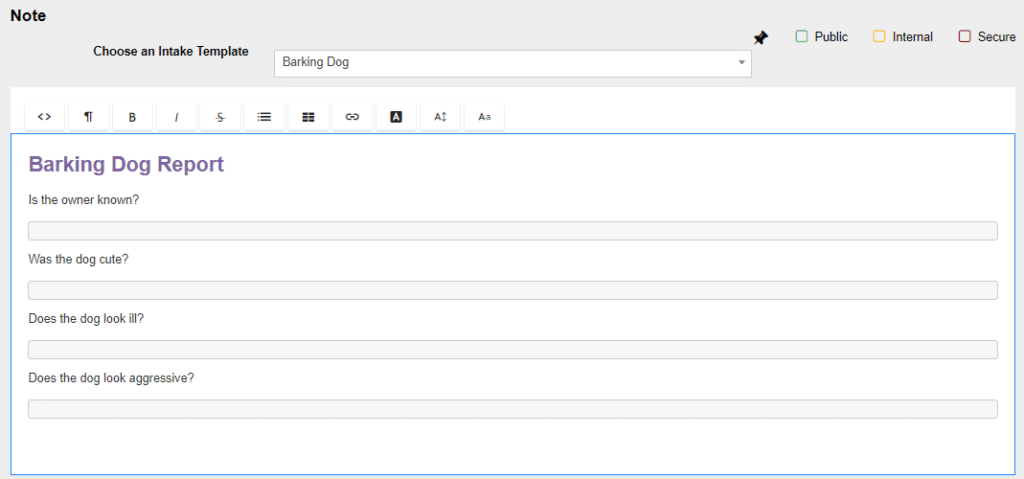
For the first note (when creating a new Case), it is possible to use a template to gather information through a pre-configured series of standardized questions. Global Intake Templates can be created and customized by Office Administrators.
For more information on how an Office Administrator can manage the Case Office’s Intake Templates, see Case Work Templates Guide.
You also have the option to ignore the default Intake Template and select another Intake Template from the drop-down. These include all Global Intake Templates created by the Domain Administrator and Case Office Intake Templates created by the Office Administrator. You can also select ‘No Template’ if you do not want an Intake Template for your Note and want to write the Note from scratch.
For additional security notes can be marked as either Internal or Secure.
Secure notes are encrypted in the database and are not searchable in the Advanced Search for contacts.
Internal notes can be excluded from certain reports.
Public notes can be seen by the Contact in the Citizen Portal.
Attachments
Files can be uploaded and added as attachments to a Case. Simply dragging a file into the Attachments table will upload the file. Alternatively, select the + button in the top left corner of the table to select a file. Uploaded files will be discarded if the Case is not saved.
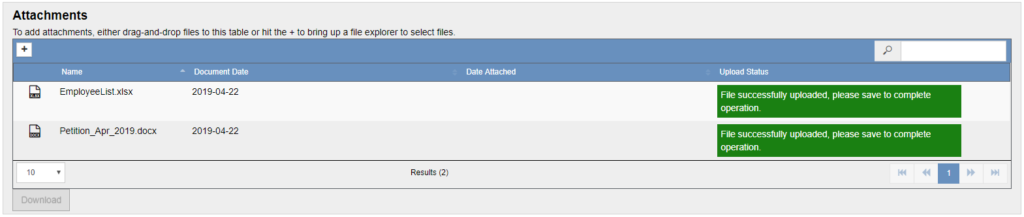
The following file types are allowed to be uploaded, all others will be rejected:
.img-center{display: block; margin: 0 auto; border:1px solid #021a40;}
- .txt
- .msg
- .eml
- .wav
- .mp3
- .mp4
- .wma
- .j2k
- .jpf
- .jpx
- .jpm
- .mj2
- .png
- .jpg
- .jpeg
- .gif
- .doc
- .docx
- webp
- webm
- hevc
- HEIC
- HEIF
- apng
- .xls
- .xlsx
- .csv
- .zip
- .ppt
- .pptx
- .rar
- AVIF
- .jxr
- .hdp
- .wdp
- .jp2
Step 5: Save the Case
Once all information has been entered, click the Save button in the bottom right corner to complete the process. If enabled, the contact will receive an email notification that the case has been created on their behalf. Case assignees will also be notified by email that a new case exists that requires their attention and follow-up.