Search Knowledge Base
FAQ – How do I create an email campaign?
AccessE11 is a lot more than just a case management system. We also offer an outreach module that allows municipal staff to send email blasts to citizens. Whether it be for city newsletters or important updates about their community, mass email communications are just one of the ways we prioritize citizen engagement.
Setting Up Mailchimp
AccessE11 works with Mailchimp for email communication, so you’ll need a Mailchimp account. After setting up your account, generate an API key in Mailchimp, which acts as a bridge for communication between Mailchimp and AccessE11. Follow this guide for detailed instructions on creating a Mailchimp API key.
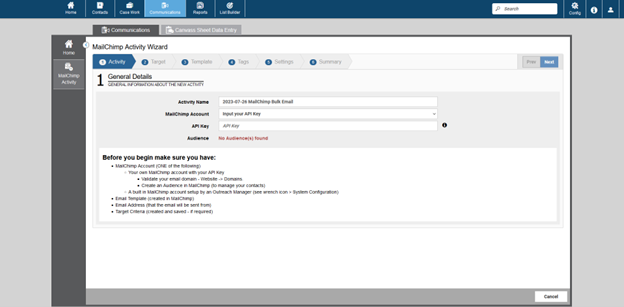
After obtaining your API key, go back to AccessE11. Under the Communications tab, click on ‘Mailchimp Email.’ In the first step of this process, enter the API key you just created in the field labeled ‘MailChimp Account.’ This action links your Mailchimp account to AccessE11, allowing you to initiate email outreach.
Give this outreach activity a name, and you can then proceed to step two.
Selecting Your Target
There are several methods for selecting your outreach campaign’s target contacts. Accurately establishing these targeted contact lists ensures that future email campaigns reach their intended recipients consistently.
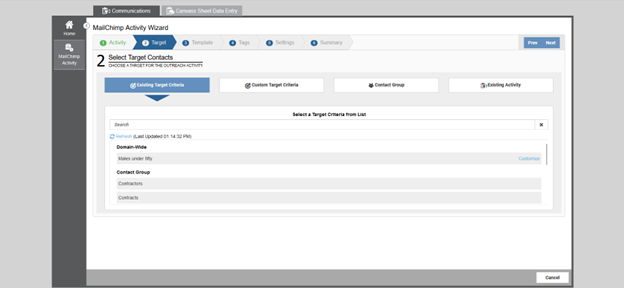
Existing Target Criteria
After choosing “Existing Target Criteria,” you’ll see options based on segments you’ve created before using the List Builder module in AccessE11. This powerful and configurable tool allows you to categorize contacts using any chosen field. Standard demographics like age, gender, location, as well as any custom fields created by your municipality.
The flexibility of target setup is virtually limitless. If you need assistance getting started with the List Builder, check out the video demo. It provides a succinct walk-through on how to make the most of this feature.
Custom Target Criteria
Creating custom target criteria is similar to the first option. The only difference with this choice is that you can now create a new segment without changing screens. Go through the steps to create a list of contacts, and it will be saved for future use under “Existing Target Criteria” as well as in your List Builder.
Contact Group
If your organization has set up multiple Contact Groups, you can utilize this option to select an entire Contact Group with a single click. If your organization does not have multiple Contact Groups, choosing this option would email every contact in the system.
Existing Activity
This option will show previous outreach campaign segments, allowing you to choose a segment you have used before.
Creating a Template
In the third step, you will craft the email content directly through Mailchimp, which will then sync to AccessE11 via the API key setup. For guidance on creating a template in Mailchimp, refer to this article.
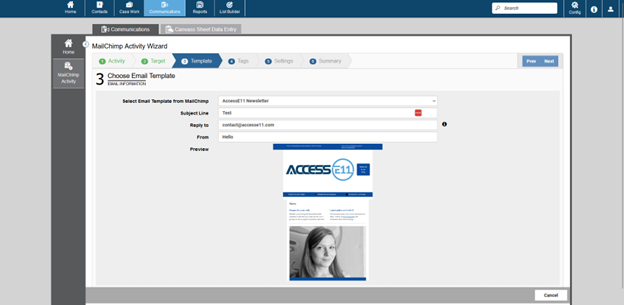
After crafting your email template, return to AccessE11. Allow a few minutes for synchronization, and then you’ll find your new template in the drop-down menu. You can fill in details like the subject line, ‘Reply-To’ address, and the sender’s information here.
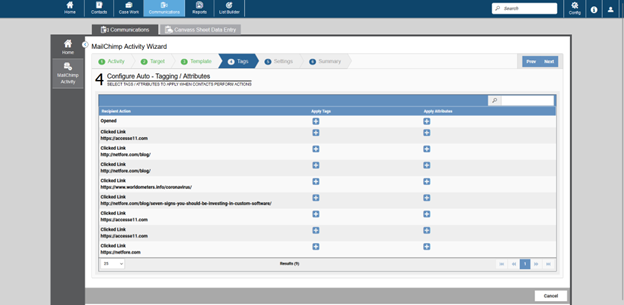
Configuring Auto Tagging
Step four involves setting up Tags for your contacts based on their potential actions upon receiving the email. Every link in the email template you’ve created will be considered a Recipient Action, including simply opening the email. You can apply a tag and/or an attribute to each of these potential actions, which will help you filter and generate reports in the future based on these specific tags and attributes associated with the contacts.
Tags and Attributes are unlimited in their scope and can be utilized for almost any purpose, depending on the needs of your municipality. For more information about Contact Tags, please visit our video demo, which briefly overview this powerful feature.
Final Settings
The final step is to choose some last settings for your outreach campaign. On this page, you can schedule this activity for a later date, as well as some other contact rules.
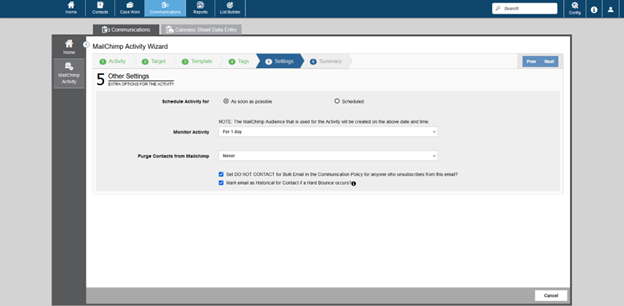
Monitor Activity means that the segment you created in AccessE11 will synchronize back with Mailchimp, set up an audience, and use their functionality to monitor the success of your outreach campaign. For more explanation of how audience statistics work in Mailchimp, visit their support article. This audience will be monitored for the time you set in this step.
Purging contacts from Mailchimp means that all those imported contacts will be deleted once the monitoring has concluded through Mailchimp. This might be a necessary option if you are on a Mailchimp plan with a small number of contacts.
Finally, if anyone unsubscribes, you can have them automatically tagged as “DO NOT CONTACT.” If their email address is a Hard Bounce, you can mark the email as Historical, meaning it is no longer an active email.
Creating outreach communication campaigns through AccessE11 offers a unique opportunity to communicate important messaging to the right citizens, while also providing the option to monitor engagement rates among your residents.