Search Knowledge Base
How To Create MailChimp Activities
MailChimp Email Activities
This user guide describes how to use foreAction along with the MailChimp email marketing platform to create and send targeted bulk emails to your constituents and then track opens and clicks. foreAction provides a dashboard that shows these statistics for each bulk email you send. It also lets you tag contacts in your database based on emails they open and links they click on, so you can capture information about their interests and behaviour in their contact profile. You can use this data later to create targeted lists of your constituents.
foreAction and MailChimp Integration
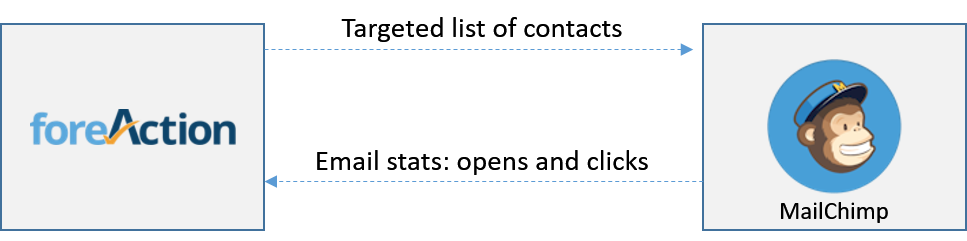
To create, send, and track bulk email campaigns, you use both foreAction and MailChimp. As your primary contact database, foreAction is used to manage your contacts, create target audiences based on specific criteria you choose, and track the statistics associated with your email campaigns. MailChimp is used to send bulk emails to your contacts.
foreAction is integrated with MailChimp via the MailChimp application programming interface (API). It uses the API to automate the exchange of information with MailChimp.
For example, foreAction uses the API to send an email target list to MailChimp after you create it from your contacts in foreAction. When you send the bulk email to this target list using MailChimp, foreAction retrieves statistics about the performance of the email campaign using the API. These statistics, such as email opens and clicks, are displayed on a dashboard that you can view in foreAction.
Initial MailChimp configuration
Before you can use foreAction to manage your bulk email campaigns, you must first create a MailChimp account and perform the following initial configuration steps:
- Head over to MailChimp.com and create a MailChimp account.
- Go to the Templates section and create a Template. Important: when creating a MailChimp template you’ll be presented with several default Templates to choose from. If you decide to use these, be sure to replace all the text inside them. If you do not, your foreAction MailChimp Activities will be rejected by the MailChimp API.
-

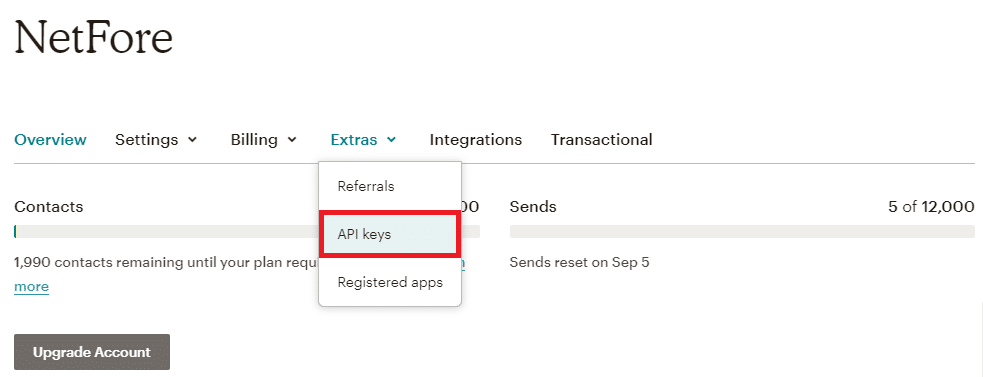
Go to the 1) Audience tab, select 2) Audience Dashboard, and then select 3) Create Audience. This Audience will be the container for the targeted list that you send to MailChimp when you create your MailChimp Activity in foreAction. We recommend using a list name of “foreAction” to make it simpler to manage. - Copy the MailChimp API key for your account. You will paste this API key into the foreAction activity Wizard when you are creating your MailChimp Activity below. To find your MailChimp API key, log into MailChimp and select your name on the top-right of the page, then select “Account” on the top right of the web page. From there, select “Extras -> API keys”. MailChimp will provide you with your current API key that you will need.
- Note: If you do not have an API key or the one displayed does not work, a new one can be created by clicking ‘Create A Key’.
For more information on how to complete these tasks, contact your System Administrator.
MailChimp Activity Wizard
Navigating to the Communications Application
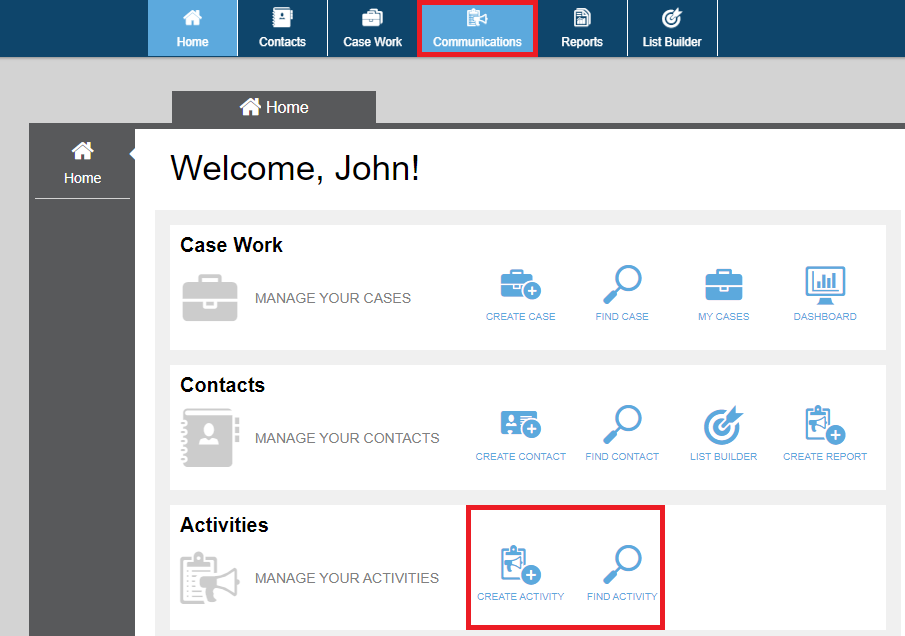
You create new MailChimp outreach activities using the MailChimp Activity Wizard, which is located in the Communications application. There are two ways to navigate to the Communications application:
- You can select one of the Activities quick links on the foreAction home screen.
- You can select Communications from the menu at the top of the page.
Creating a New MailChimp Activity
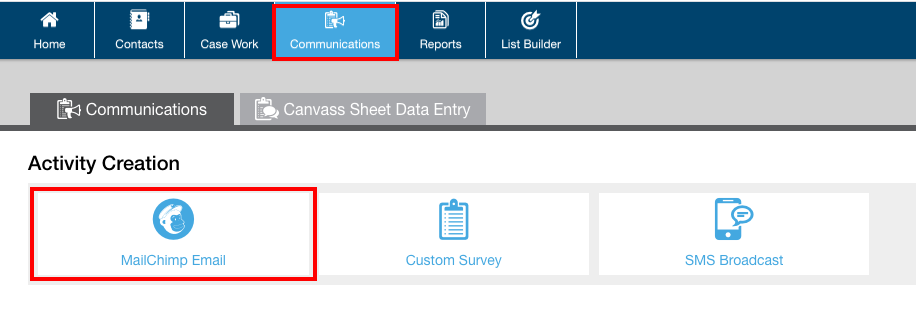
To create a new MailChimp Activity, select the MailChimp Email option. The MailChimp Activity Wizard is displayed.
The steps in the Wizard are:
- Activity – Provide a name for the bulk email activity for tracking purposes. This is also where you’ll want to paste in your MailChimp API Key and List.
- Target – Choose a target list of contacts who will receive the bulk email.
- Template – This is where you’ll select your MailChimp Template created in when configuring your MailChimp account.
- Tags – Tag or assign attributes to contacts based on opens and clicks.
- Settings – Some more options for the Activity.
- Summary – Displays the options chosen in the previous steps.
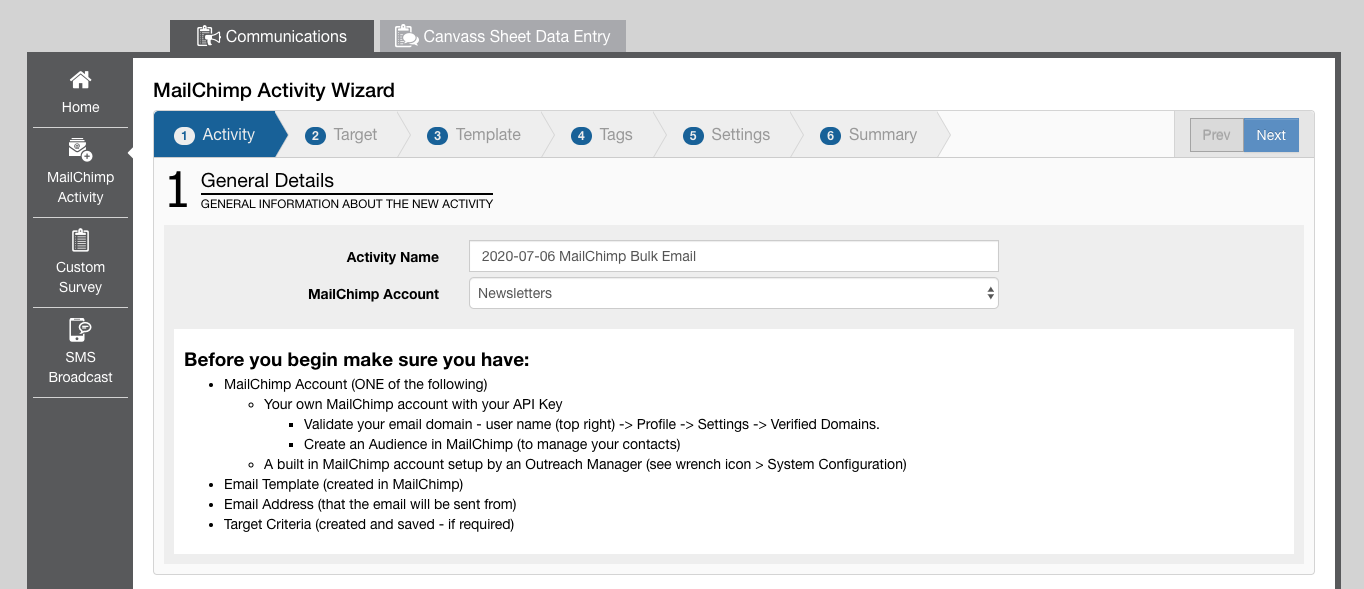
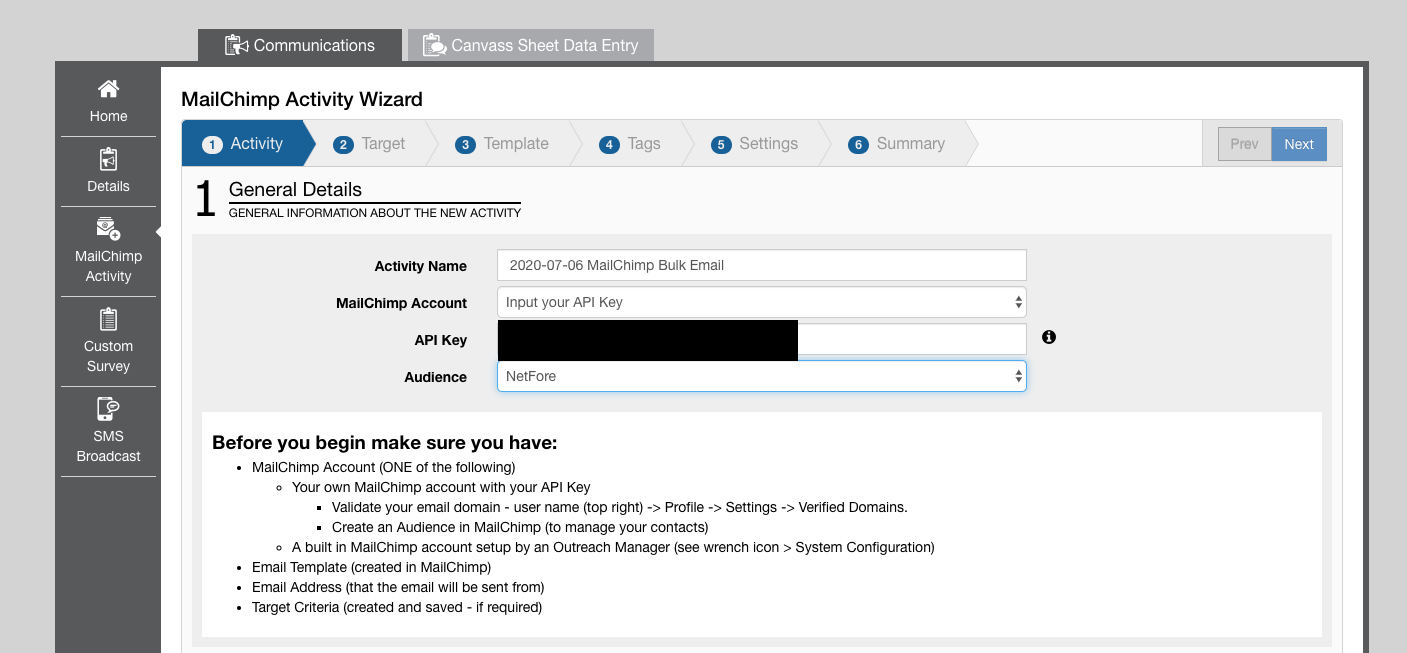
Step 1: Naming the Activity
In Step 1 of the Wizard, provide a name for the activity. Choose a descriptive name so you can easily distinguish it from other activities in the system when you want to check on statistics associated with it.
This is also where you’ll paste in your MailChimp API Key. This API key can be found by accessing your MailChimp account. Once you’ve entered your API Key, select the desired List from the dropdown below.
Once this is complete, click next.
Step 2: Choosing a Targeted List of Contacts
All of your organization’s contacts are stored in the foreAction database. Using foreAction, you can target specific groups of people to whom the mass email is sent .
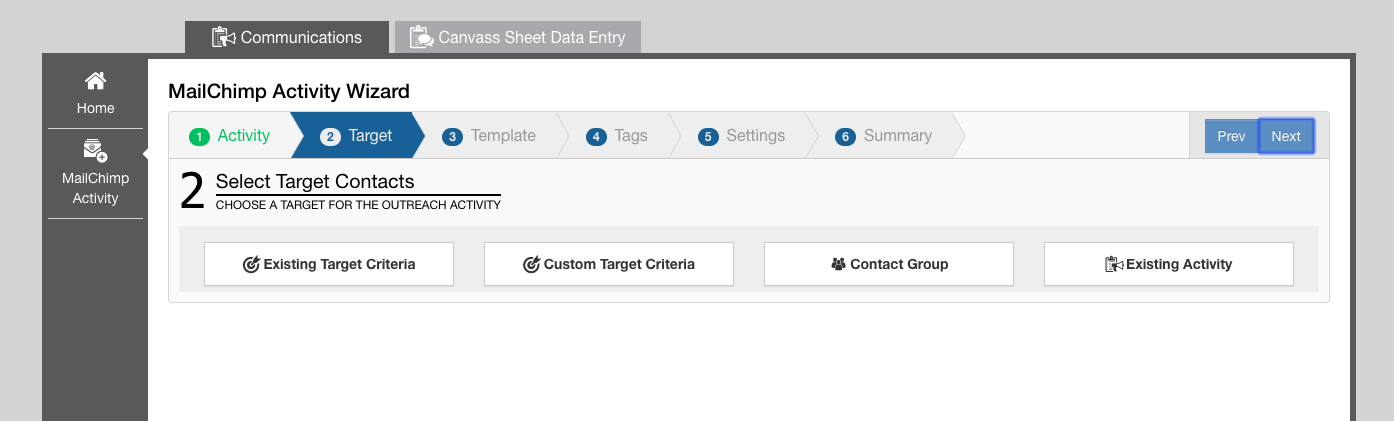
There are four options for doing this:
- Existing Target Criteria – You can select target criteria that have previously been created using the List Builder.
- Custom Target Criteria – You can target contacts based on a variety of custom criteria. This will give you many options that will help to group contacts based on their shared characteristics.
- Contact Group –You can target all contacts that are assigned to one of the contact groups that exists for your organization.
- Existing Activity – You can select a previously executed outreach activity from the list of stored list of pre-existing activities to target the same set of contacts again.
Choose the target type from these options, then choose a specific target from the choices available to you. If the choices are numerous, it is useful to type the name of the target of interest in the search box.
Click next to continue to Step 3 of the Wizard.
Step 3: Selecting your MailChimp List
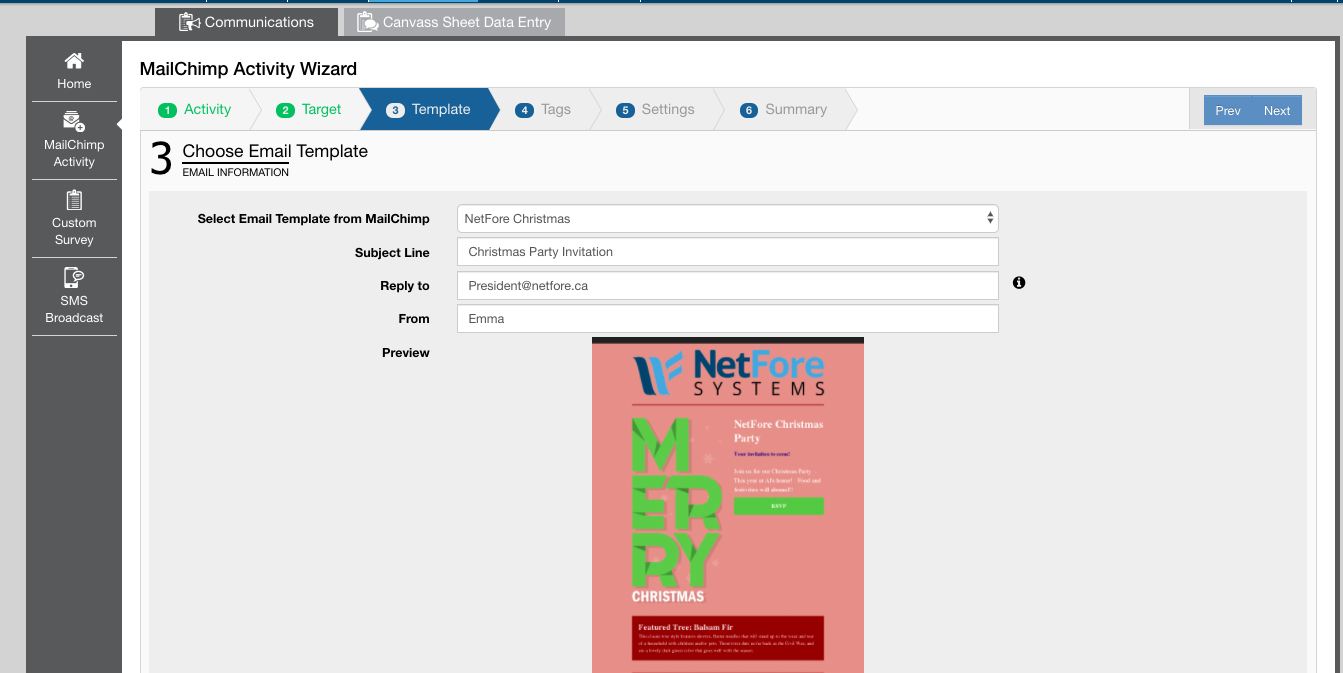
- Select the desired ‘MailChimp Email Template’ created for your account. Once selected, you’ll see a preview of it at the bottom of the page.
- Enter the ‘Subject Line’ for your bulk email
- Enter the ‘Reply To’ email address for your bulk email.
- Important: this email must be from a verified email domain (e.g. @mycompany.com) on MailChimp. To verify your email’s domain, in MailChimp select your user name (top right) -> Profile -> Settings -> Domains. Ensure that your email domain is already listed. If not, click the button to Verify a Domain and follow the steps provided by MailChimp.
- Enter your desired ‘From’ name for your bulk email.
Step 4: Configuring Auto Tagging / Attributes
When sending out bulk-emails, it can be helpful to automatically tag or give attributes to Contacts based on how they interact with the email. These ‘actions’ are generated from your MailChimp Template. You will always have the ‘Opened’ action, which indicates that the recipient opened the email. Our example below also includes three links, and we can choose to tag / add an attribute a contact if they click on a link.
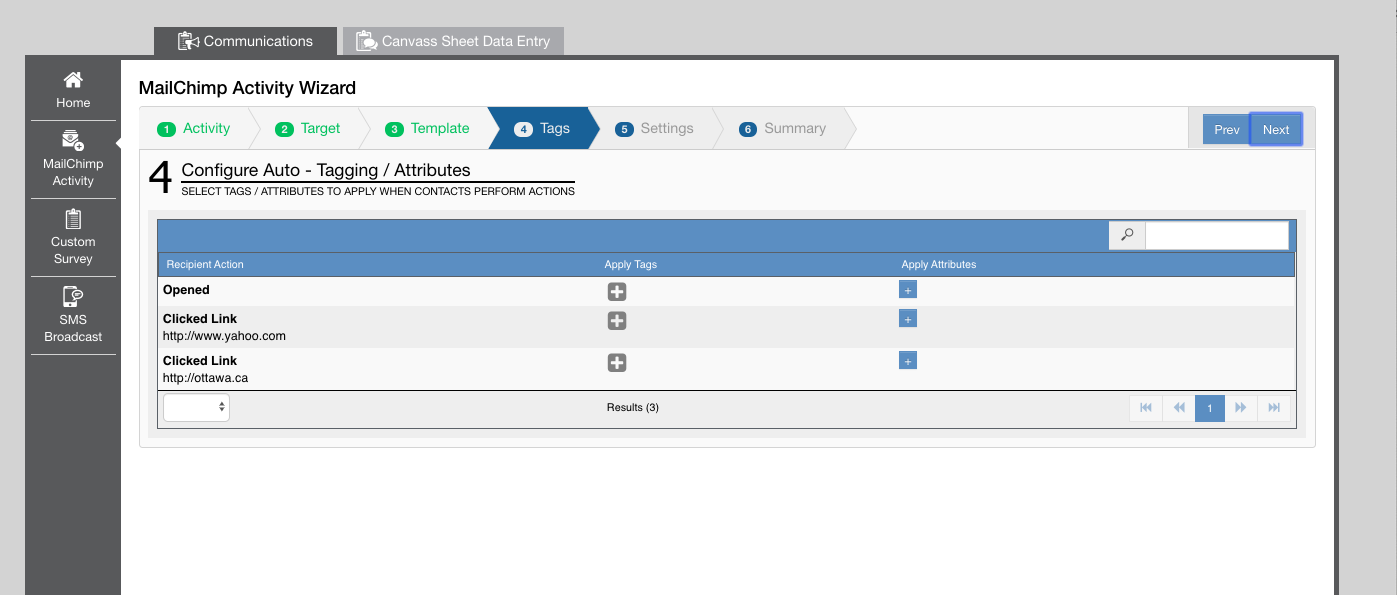
- To add a Tag or Attribute, click the ‘+’ icon on the desired row.
- If you’re adding a Tag, a modal will pop up. Click as many tags as you’d like and click Submit to finish adding Tags.
- If you’re adding an Attribute, a different modal will pop up. First, select the desired Attribute. Then fill out the details you’d like the Attributes to have. Click Submit to finish adding the Attribute. You can view the Attribute’s details by hovering over it.
- Note: Your system may not have Attributes.
- You can remove Tags or Attributes by clicking the ‘x’ next to their name.
Step 5: Configuring other Settings
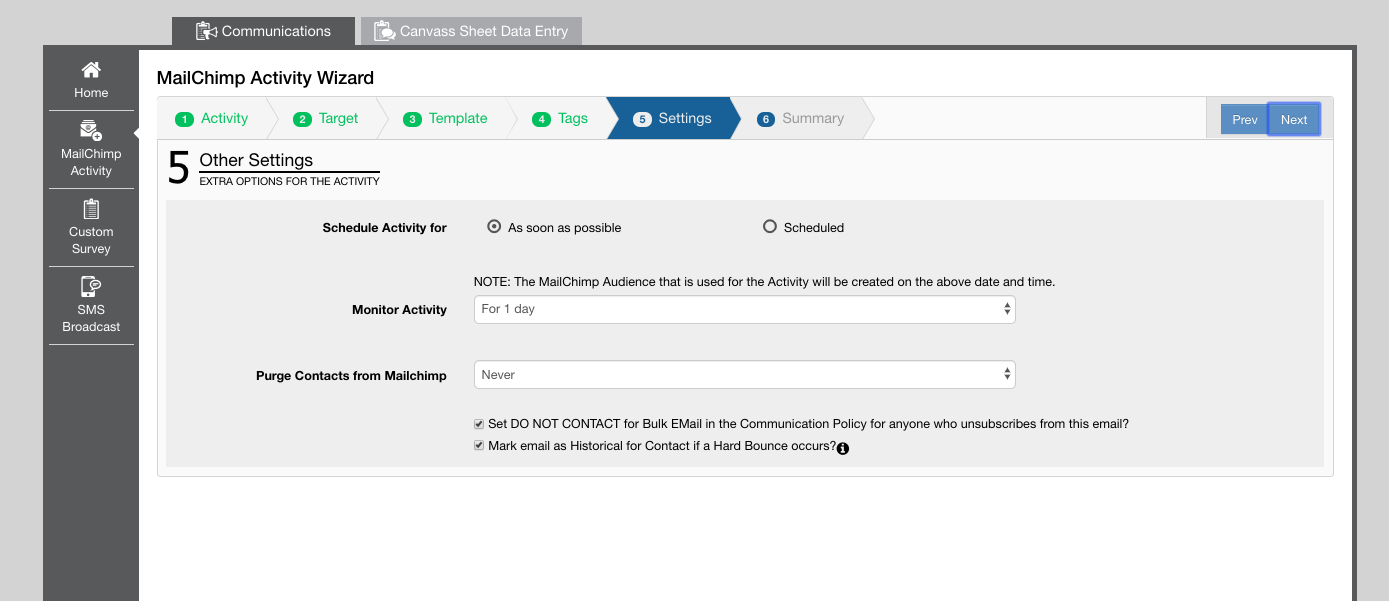
This is where you can configure any other settings for your MailChimp Activity:
- Setting Activity for – You can choose to send out the bulk-email either as soon as possible or at a scheduled time.
- Monitor Activity – This will determine how long you’d like to monitor your bulk email. Once monitoring is complete, foreAction will no longer receive updates from MailChimp. The MailChimp Activity will also be marked as Complete.
- Purge Contacts from MailChimp – Depending on your account setting, you could have a limit on how many Contacts MailChimp will allow you to have at once. This option allows you to purge the contacts from MailChimp once the monitoring has ended.
- Set DO NOT CONTACT… – Emails sent with MailChimp include an unsubscribe button at the bottom of the page. If a recipient uses this option, they can no longer be contacted via MailChimp. This option allows you to mark the Contact as ‘do not contact’ for bulk emails as well.
- Mark email as historical if a Hard Bounce occurs – A Hard Bounce indicates that an email could not be delivered. This could be because the email address is invalid, or an unexpected error occurred during sending. This option allows you to automatically expire the email being used if this occurs. Expired emails can still be found in a Contact’s History tab.
Step 6: Reviewing and Launching your Activity
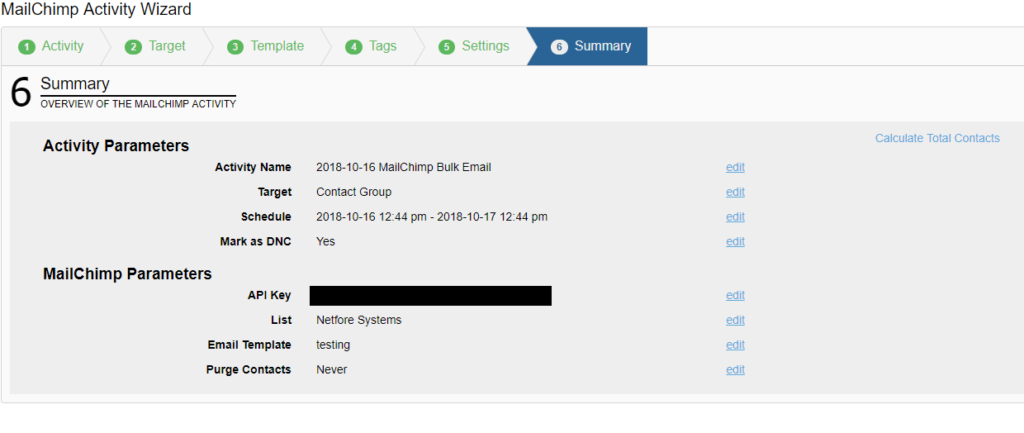
This page allows you to review all the basic information for your MailChimp Activity before you launch.
Some tips:
- You can view the number of contacts that will be emailed by clicking the ‘Calculate Total Contacts’ option on the top-right.
- You can click edit next to any configuration you wish to go back and change. Please note that editing earlier steps could cause you to lose options at later steps.
Once you’re ready, click the green Launch (or Launch on Date) button on the bottom-right of the page to finish creating you MailChimp Activity.
This process may take time if you have many Contacts to add to the activity. Once the activity has been created, you’ll be re-directed to the main page of monitoring your activity.
Monitoring the Bulk Email Activity
Finding your MailChimp Activity
Once you are in the Communications application, scroll down to the Activity History section of the application to view a list of activities. The activities you can see are based on your system role and the contact group with which you are associated.
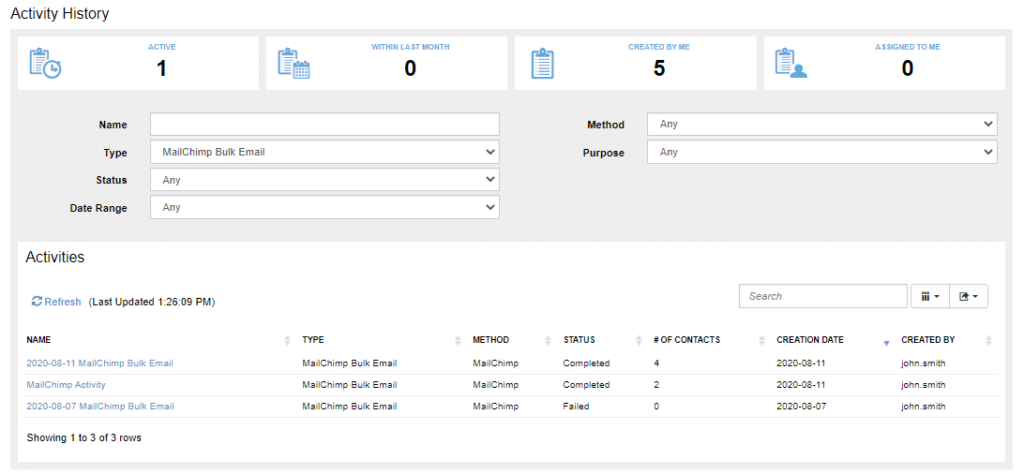
To find activities of interest, provide distinguishing information in the search fields provided and click search. The type field can be used if you only want to see MailChimp Activities.
Viewing Activity Details
Clicking on the table entry for an activity will display a view containing more details for that activity. If you select a bulk email activity, you will see a summary dashboard for the activity similar to the following.
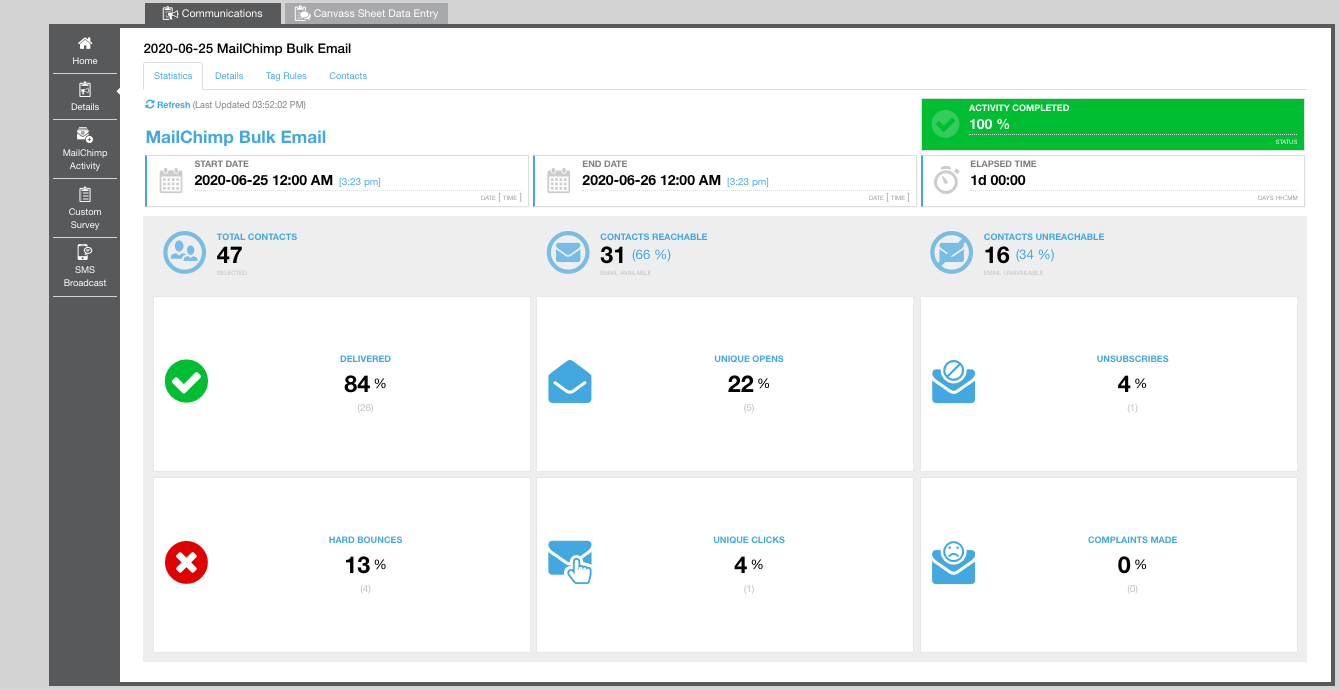
To view the Tag rules you created go to the Tag Rules tab.
To view any Contacts in your Activity, click the Contacts tab. You can choose to either view or delete them by hovering over the desired Contact’s ‘Action’ column.
Reviewing or Changing Activity Details
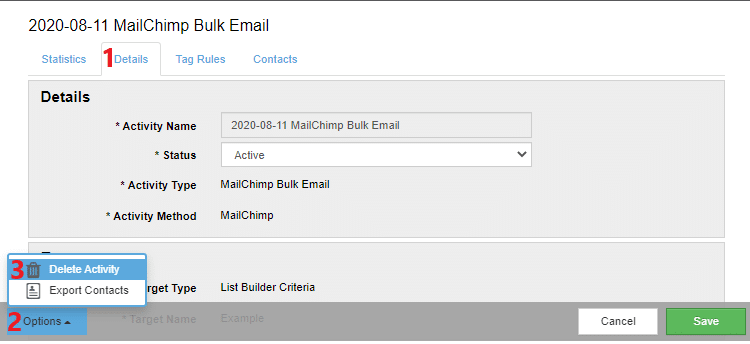
You can review the details of a bulk email outreach activity, and modify some of these details, even after the activity is in-progress. When you select a specific outreach activity from your table of activities, the details for this activity can be found under the Details tab. Please note that once the Activity has started, it will be impossible to edit most of these fields.
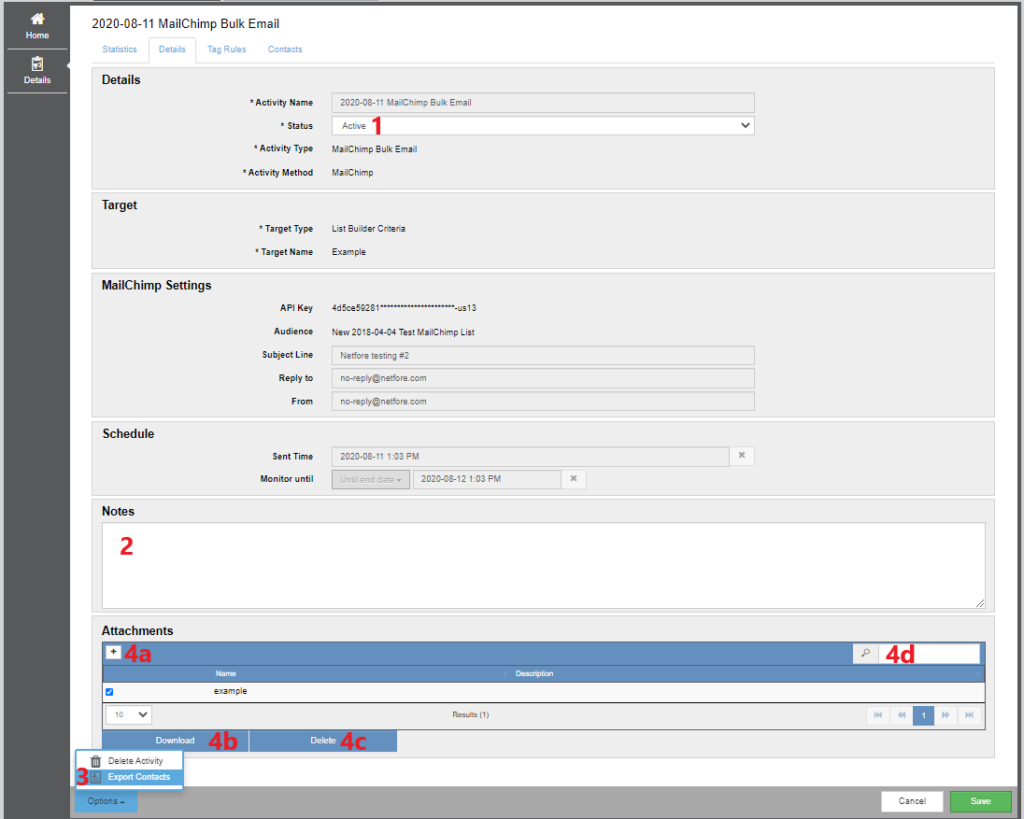
- If you want to change the status of a MailChimp Activity, from Active to Completed or vice versa, Click on the Status drop-down menu, then select the desired option.
- If you want to add notes to an activity, enter it in the text box under Notes.
- If you want to get a list of all the contacts associated with the activity, select Export Contacts from the Options pop-up menu at the bottom left of the screen. Then, in the pop-up, select if you want a list of single contacts or if you want a list organized by household. To view the report, navigate to the Reports application by clicking on the Reports button from the menu at top of the page. Then Select the Report History tab in the menu at the left of the screen. To download a report select it from the table and click the download icon (to view the icon, hover over the report row) on the right side of the report row.
- a) If you want to add an attachment to the MailChimp activity, click on the + under Attachments. Then select the file you want to attach by clicking on browse in the pop-up. If you want, you can add a description for the attachment in the Description text box in the pop-up. Then when you are done, click Save at the bottom right corner of the pop-up to attach the file.
b) If you want to download an attachment, select the check-box at the right of the attachment line, then click download on the bottom left of the Attachments table. If you want to download multiple attachments at once, select all the check-boxes of the files you want to download.
c) If you want to delete an attachment, select the check-box at the right of the attachment line, then click delete on the bottom left of the Attachments table. If you want to delete multiple attachments at once, select all the check-boxes of the files you want to delete.
d) If you have multiple attachments attached to the MailChimp activity, you can search for one using the search box at the top right corner of the Attachments table.
Deleting a MailChimp Outreach Activity
Users who have the required system permissions can delete outreach activities from the Activities/Details view. To do so, Select the activity you wish to delete from the table of activities you are associated.
Once you have done this:
- Select the Details tab under the Activity name.
- Click on the Options button at the bottom left of the screen.
- Select Delete Activity from the Options pop-up menu. Then click Confirm Delete when asked to confirm your intentions. Note that this results in all data associated with the activity being permanently deleted from the database.