Search Knowledge Base
How To Manage Case Office Categories
Case Office Categories
Cases are categorized to help your Case Office in searching for, reporting on, and in managing Cases. The platform’s management features for Case Categories allow you to:
- Create, View, Edit, and Delete Case Categories for your Case Office
- Specify Defaults for Follow Up Date/Time, and Due Date
- Configure Default Assignees for the Category, along with queuing if desired
- Define category-specific overrides for the Case Intake Template, and the Email Templates for Staff and Contacts

Note: Prior to creating and configuring a Case Office Category, it is important to define default Follow up Date/Time, Due Date, User Assignment, Case Intake Template, and Email Templates at the Case Office level. To do so see How To Administer a Case Office.
To manage Case Categories:
- Select the Case Work icon from the menu at the top of the page.
- Select the Case Work Administration tab within the Case Work Application.
- Choose Case Categories in the lefthand menu.
Creating a Case Office Category
To create a new Category for your Case Office:
- In the case category hierarchy, click the pencil to the right of the Category you wish to be the parent for the new Category. If you wish this to be a top-level Category, click the pencil beside the Case Office name.
You will be presented with a form similar to the following.
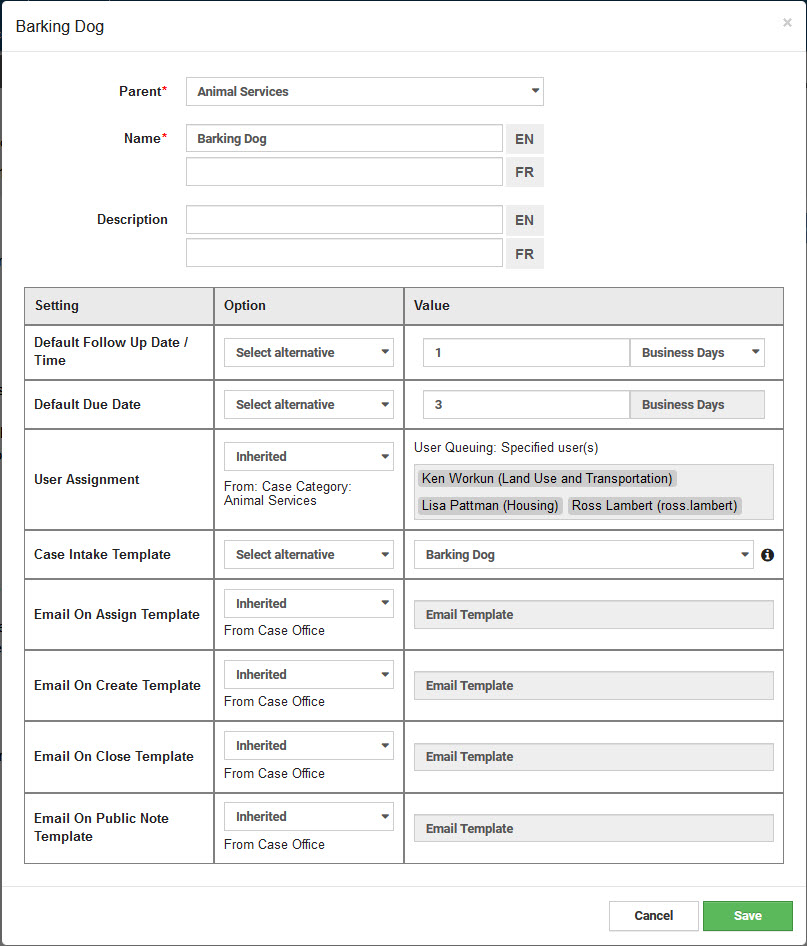
User Assignment Configuration
By default, the category’s user assignment strategy will be “Inherited” from whatever has been defined for the Case Office generally. This will be one of five potential options.
- Current User: The system user who creates the case.
- None: No default assignment applies, i.e. an assignee must be explicitly selected
- Specified Users: Assignee(s) are pre-selected from the pool of system users
- User Queuing: Specified user(s): Assignee is selected from a list you pre-specify based on longest wait since receiving their last case assignment.
- User Queuing: Excluding specified users: Assignee is selected from all users in the case office that excludes users you pre-specify based on longest wait since receiving their last case assignment.
At the category level, there are options to override the default user assignment options described above. To do so, choose “Select Alternative” and configure how you want user assignment for the category to work.
In the event that you want to prevent default assignment entirely, choose “None”.
Follow Up Date, Due Date, Intake Template, and Email Templates Configuration
You also have three choices for setting a Default Follow up Date/Time, Default Due Date, the Case Intake Template, and the Email Templates.
- Inherited: This means that the value is set to what is configured for the closest Parent Category that is not also inheriting from further up the hierarchy or, in the most basic configuration, from the Case Office defaults. As an example, for the Category shown in the above picture, Default Due Date inherits from its Parent Category “Public Works” which, in this case, is 3 business days from the time the issue is raised.
- Select alternative: This is used as an alternative to inheriting from a Parent Category, and allows you to be specific about follow-up dates, due dates, and intake templates anywhere in the Case Category hierarchy.
- None:
- If the Default Follow Up Date/Time is set to None, when a new Case is created with this Category, the Follow Up Date/Time will not automatically be set.
- If the Default Due Date is set to None, when a new Case is created with this Category, the Due Date will not automatically be set.
- If the Case Intake Template is set to None, the first note added during Case creation will be free-form rather than being guided by a templated set of questions.
- If any Email Template is set to None, the associated email type will not be sent.
Notes
- For the Case Intake Template, if neither the Case Office nor the Domain has a pre-defined Case Intake Template this option will not be available, see How to Manage Case Office Templates for more information.
- Any of the configurations described above are automatically used for Sub-Categories unless specifically overridden.
Editing a Case Office Category
To view and edit an existing Case Category for the current Case Office, simply click the pencil to the right of the category you wish to open. The Parent Category, Name, Description, User Assignment settings, Default Follow Up Date/Time, Default Due Date, Case Intake Template, and Email Templates for the selected Case Category will be shown. Changes to any aspect of this information can be achieved similarly to what is described above for Creating a Case Office Category.
When editing a Due Date in particular, after clicking Save a pop-up will appear.
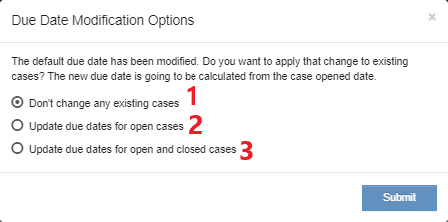
You will be prompted to select from three options:
1) Only change the Default Due Date for Cases created in the future
2) Change the Default Due Date for existing Open Cases and Cases created in the future
3) Change the Default Due Date in all existing Cases as well as Cases created in the future
Deleting a Case Office Category
To delete a Case Category, simply click the red trash can to the right of the case office category you wish to delete. Because this will remove the Case Category permanently, you will be prompted to confirm your action. Note that if there are existing Cases that are using the selected Category, this will not be possible, see FAQ: Why Can’t I Delete a Case Category? for more information.