Search Knowledge Base
How To Administer a Case Office
Case Office Administration
Within Case Work, users that are logged in with privileges for managing a Case Office will see a Case Office Administration tab. The features available under this tab allow you to configure your Case Office and the Staff assigned to it.
Finding a Case Office
This option is only available if you have access to more than one Case Office.
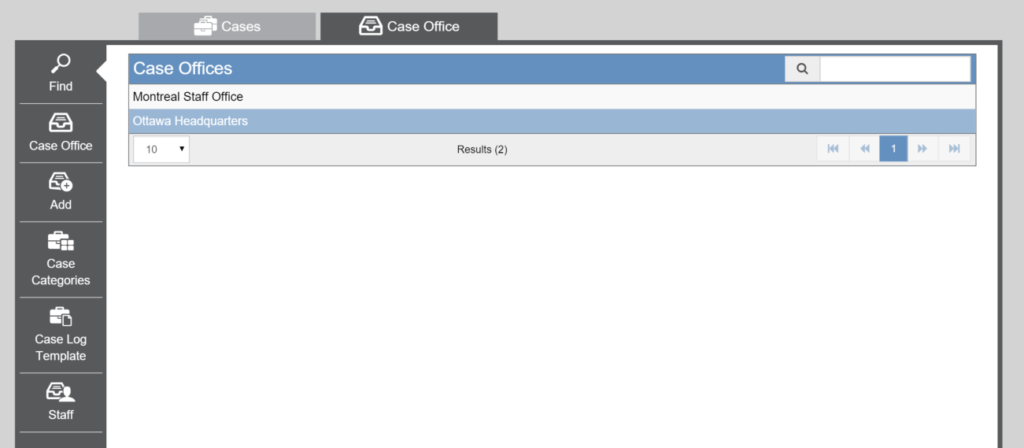
To switch your current Case Office, click the Find item on the left-hand menu, search for the desired Case Office, then click on its name. This will take you the a page where general information for the Case Office can be viewed and edited.
Editing a Case Office
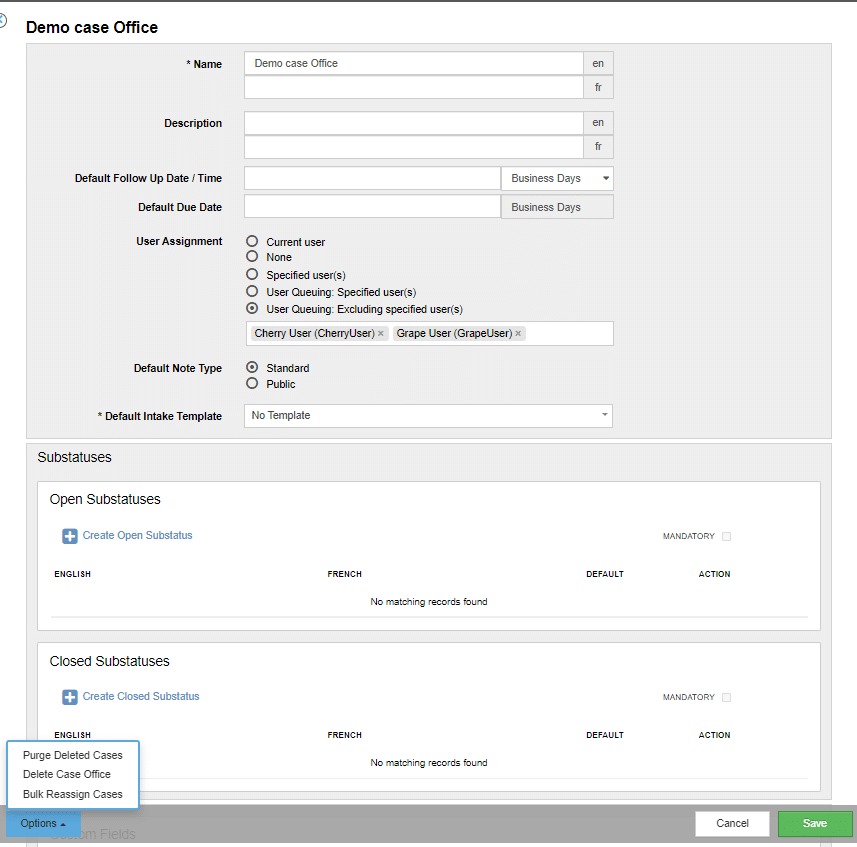
When Case Office is selected in the left-hand menu, the following page will be shown:
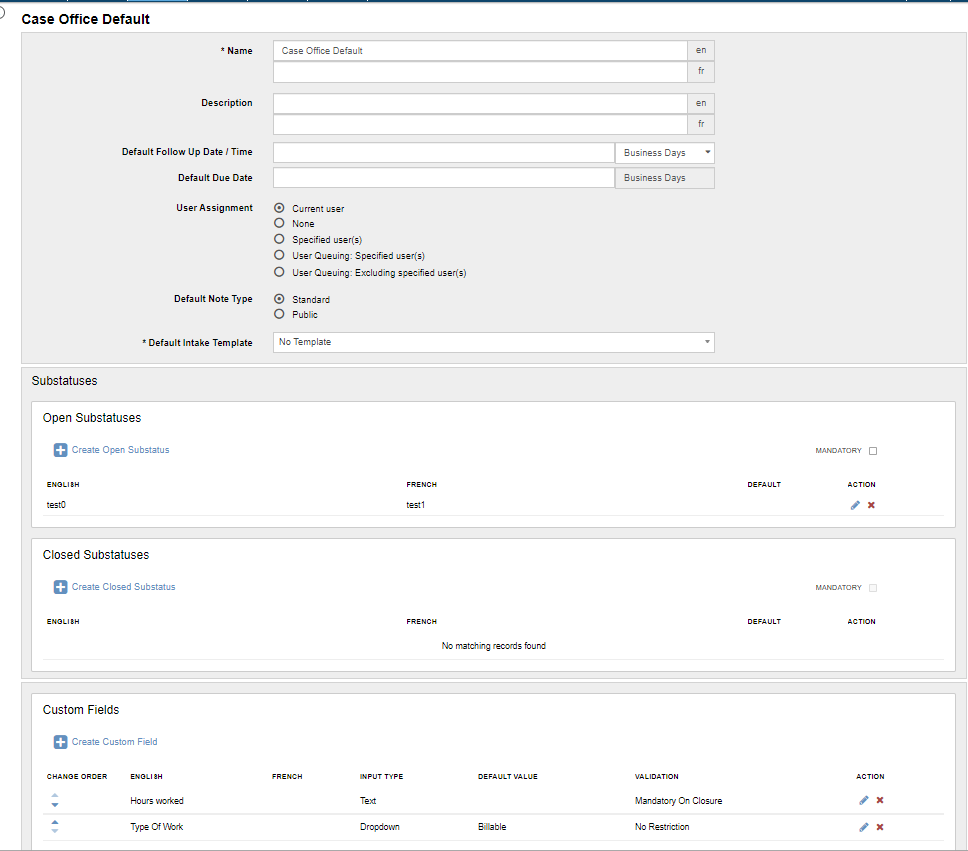
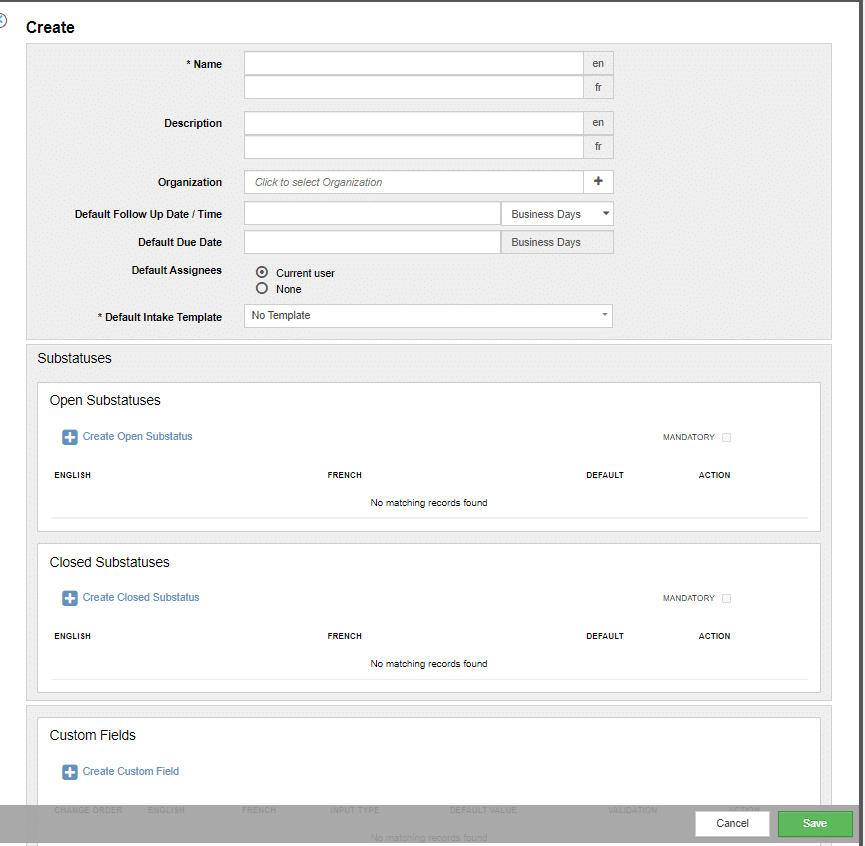
You’ll see the name of the selected Case Office at the top of the page.
You can edit the Name and optional Description for the Case Office.
Case Office Configuration
There are several items that will affect how Cases created in the Case Office are managed. Note that this information can be set here for the entire Case Office, but the same information can also be specified at the Case Category level. To do so see How To Manage Case Office Categories.
For Cases in your Case Office, you can set up a Default Follow Up Date / Time for as well as Default Due Dates.
Note 1: When editing a Due Date, after clicking Save a pop-up will appear. For more information, see Due Date Pop-up below.
Note 2: There are several Reports available that will provide statistics related to Due Dates, for example the number of Cases that have met or exceeded the target Due Date. For the instructions on how to create these Reports see How To Create Reports.
When setting up default User Assignment for Cases in your Case Office, there are five options:
1) Current user: You can specify the user that is creating the Case to be the Default Assignee.
2) None: You can specify no Default Assignees meaning that the assignee(s) will need to selected manually.
3) Specified user(s): You can pre-specify specific users to be the Default Assignees.
4) User Queuing: Specified user(s): This assigns the Case to the user from the list you pre-specify that has been longest since receiving their last Case assignment.
5) User Queuing: Excluding specified users: This assigns the Case to the user not in the list your pre-specify that has been longest since receiving their last Case assignment.
You can specify whether Case notes are, by default, viewable by the public or not.
And finally, you can choose the Default Intake Template for the Case Office. This is the template that will be used for the initial Note when creating a Case for the current Case Office.
Due Date Pop-up
When editing a Due Date, after clicking Save a pop-up will appear.
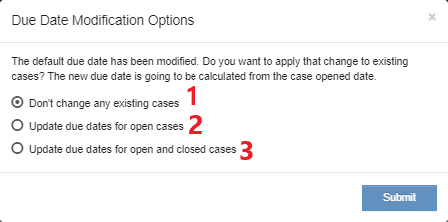
Three options should appear in the pop-up:
- Only set the Default Due Date for Cases created in the future (1)
- Set the Default Due Date for existing Open Cases and for all Cases created in the future (2)
- Set the Default Due Date for all existing Cases and for all Cases created in the future (3)
Once, you have selected the option you want, click Submit for the changes to take effect.
Substatuses
It can be useful to track the status of cases at a more granular level than Open or Closed. For example, you might want to classify Open Cases as “In Progress” or “Waiting on Citizen Feedback” if they are being worked on, or Closed Cases as “Resolved” if they have been successfully addressed. It is possible to do so in a way that meets your needs using the Substatus feature.
Creating a Substatus
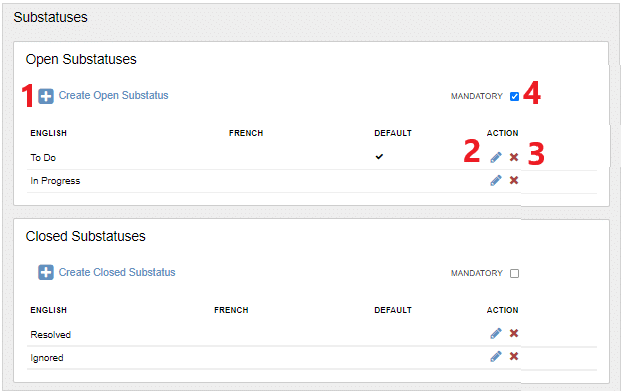
To Create an Open or Closed Substatus, click on the + sign (1) for the type you want to create. The following pop-up will appear on your screen.
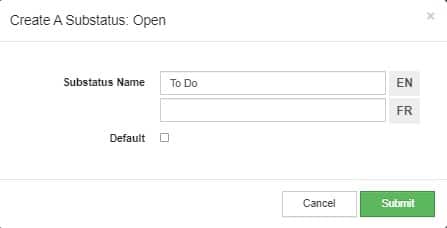
In the pop-up, you can specify the name for the Substatus in both English and French. You can also use the Default checkbox if you want the designate the newly created Substatus to be the Default Open Status when creating an Open Substatus, or the Default Closed Status if you are creating a Closed Substatus. When you are done inputting the desired information, click Submit to create the Substatus.
Editing a Substatus
To Edit an existing Substatus, click on the pencil icon (2) in the appropriate row in the table. The following pop-up will appear on your screen.
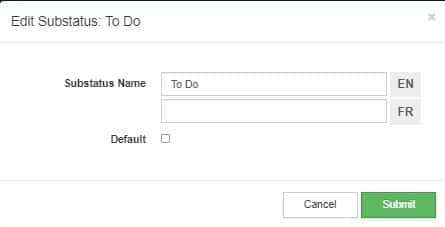
In the pop-up, you can edit the name of the Substatus in both English and French. You can also choose if you want the Substatus to be the Default. When you are done inputting the desired information, click Submit to apply the changes.
Deleting a Substatus
To Delete a Substatus, click on the red X (3) in the appropriate row in the table.
Setting a Substatus to be Mandatory:
It can be desirable to make the specification of a Substatus mandatory for all open Cases or all closed Cases. To do so, select the checkbox (4) next to Mandatory. If not already specified, you will be required to choose a default Substatus to proceed:
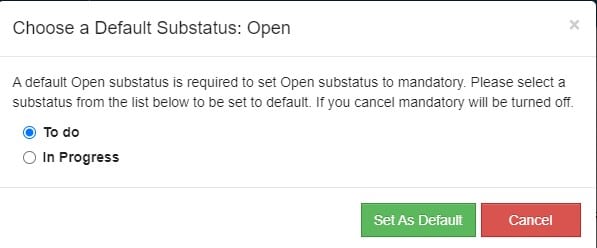
To apply the selection click Set As Default.
Custom Fields
Separate from the standard fields that can be specified for the Cases in your Case Office, you can define up to 10 Custom Fields that will be available when creating and editing Cases as well as for reporting.
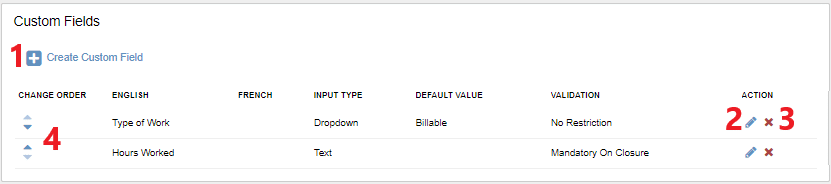
Creating a Custom Field
To define a new Custom Field, click on the + Create Custom Field (1). The following pop-up will appear on your screen.
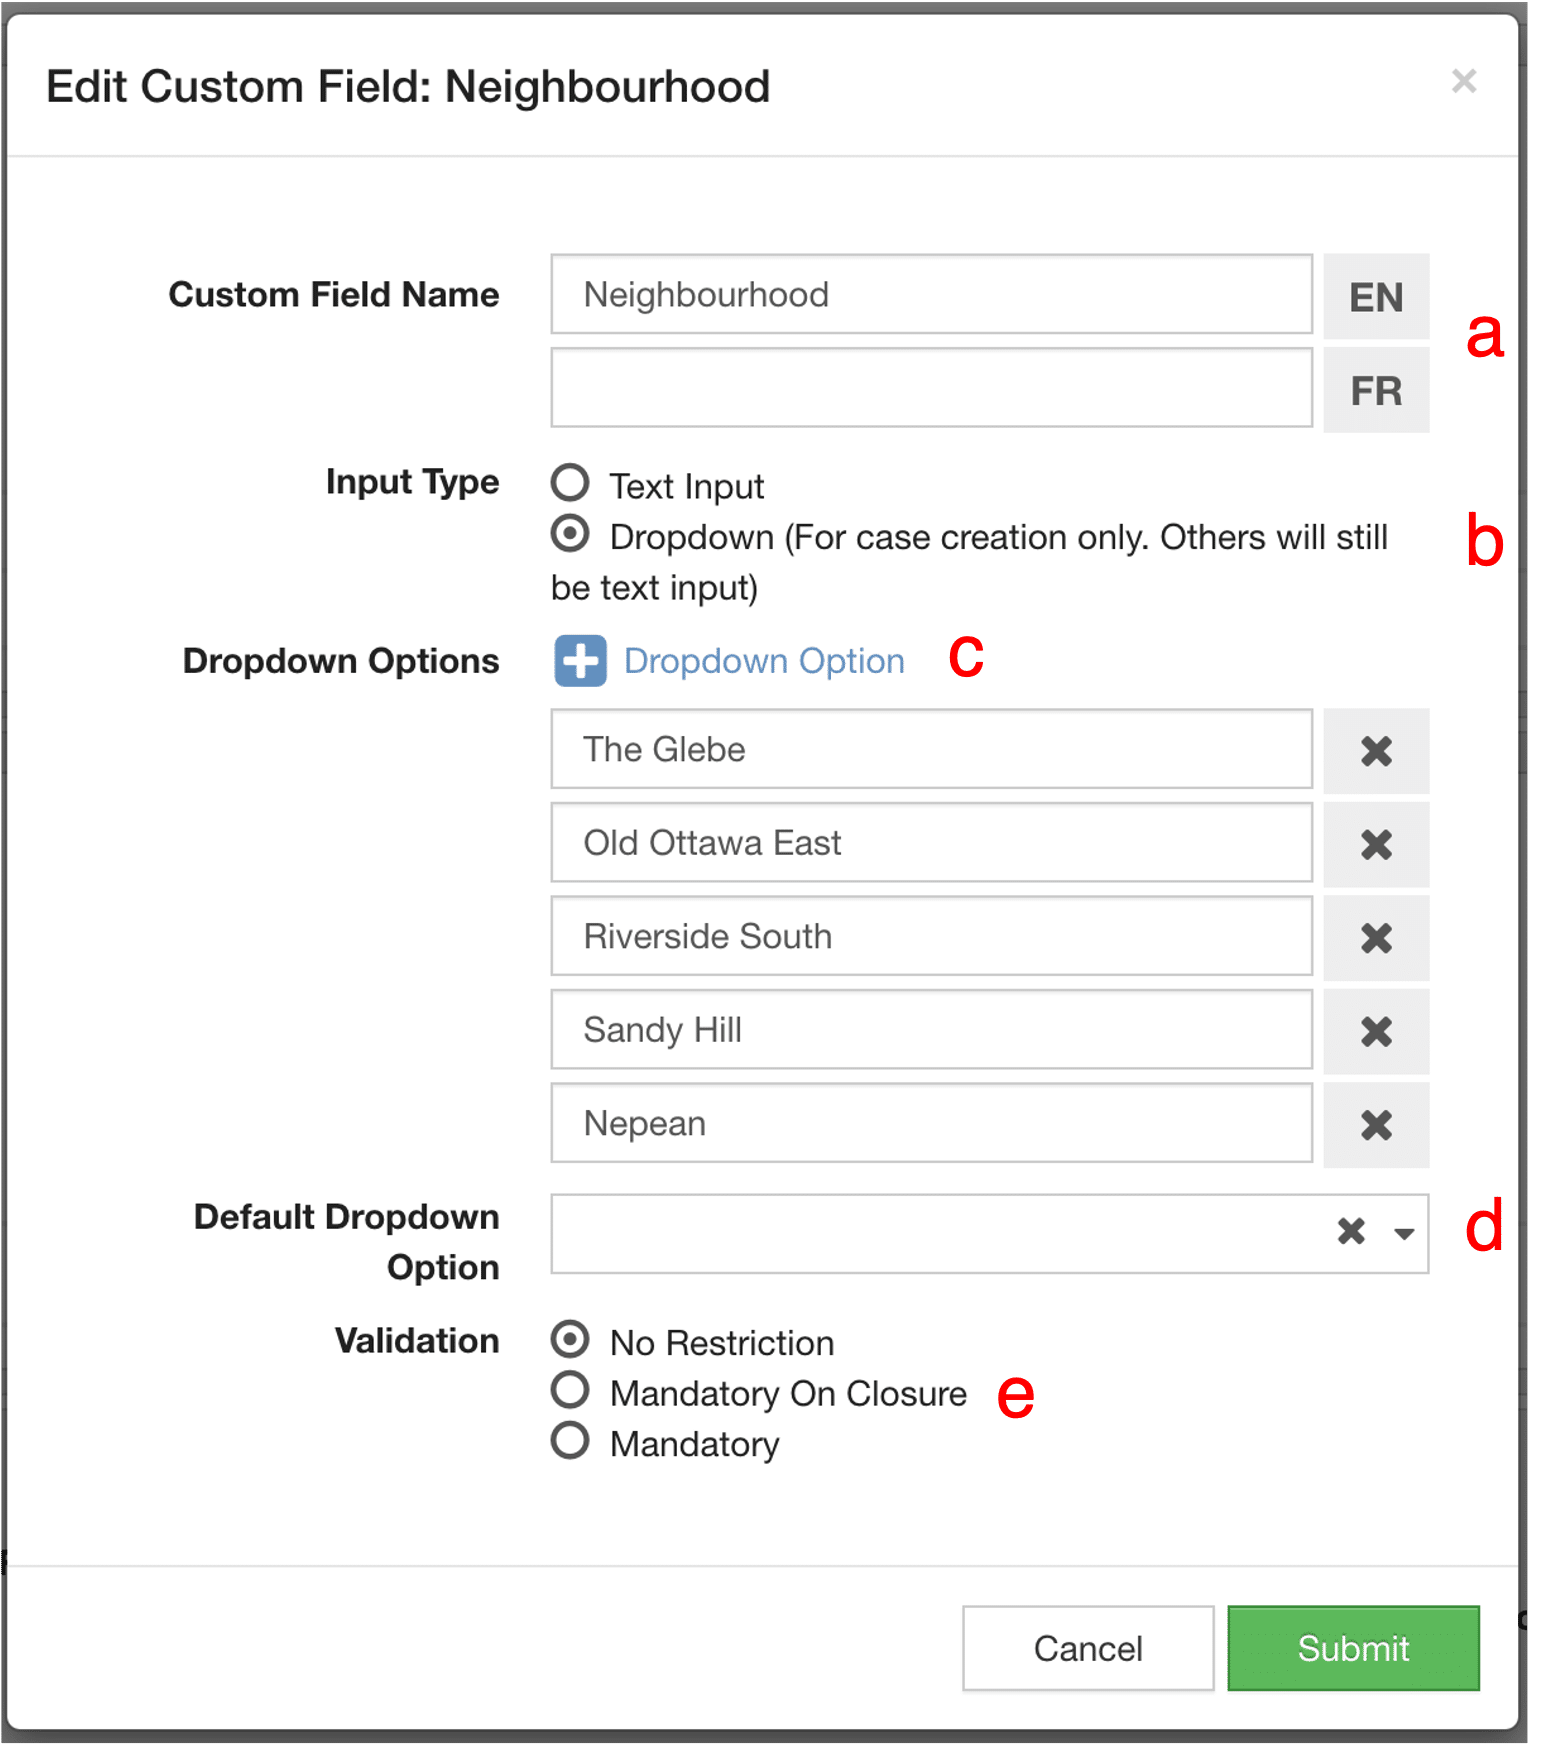
- Specify the Name to be used for the Custom Field (a)
- Choose the Input Type for the Custom Field. There are two options: (i) Text Input: Users provide freeform information and, (ii) Dropdown: Users select one of the options you have associated to the Custom Field (b)
- For the Dropdown Input Type, enter the Dropdown options (c)
- If desired, choose a default option for the Dropdown (d)
- Choose if and how Custom Fields are validated: (i)) No Restriction: Entering data for the Custom Field is optional for Users, (ii) Mandatory on Closure: The Custom Field must be specified only when closing the Case and, (iii) Mandatory: It is always necessary for Users to to fill out the Custom Field (e)
When you are done, select the Submit button in the bottom right corner of the pop-up.
Editing a Custom Field
To Edit an existing Custom Field, click on the pencil icon (2) in the appropriate row in the table. Then edit the fields in the pop-up. See above for more information about the fields in the pop-up.
Deleting a Custom Field
To Delete a Custom Field, click on the red X (3) in the appropriate row in the table.
Setting the order of the Custom Fields
To adjust the order of the custom fields, click on the arrows (4).
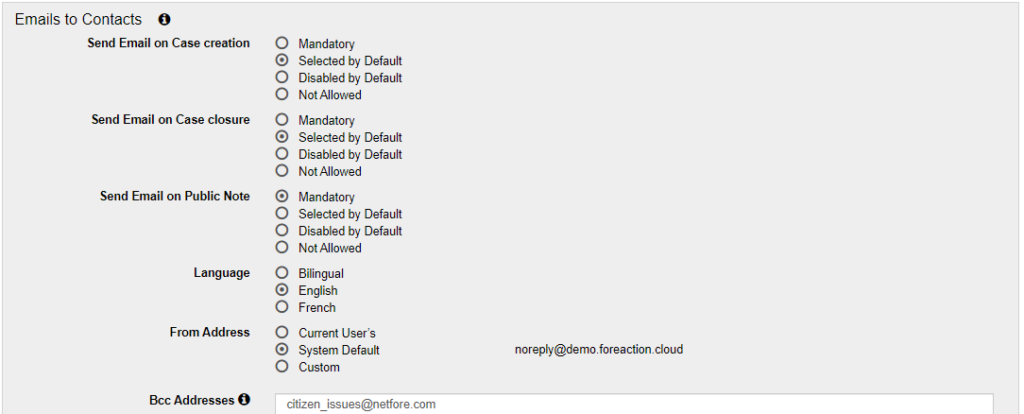
Case Office Emails
You can specify how to email Staff and Contacts:
Emails From Address: You can select the From Address for Emails to Contacts to be the Current User’s, the System Default, or a Custom address.
Emails to Staff: You can select the following:
- Language for sending emails
- Whether to email staff with daily reminders
- Whether to email staff when cases are assigned
- Whether to email staff when any modification is made to cases with which they are involved, or if they are only emailed when a core field is modified. The core fields include: the follow-up date, the next steps, the assignee, the notes, and the status.
NOTE: For emails sent to
Emails to Contacts: You can select whether the Contact – for whom a Case was created – will receive an email when the Case is created and/or closed, or when a Public Note is created or edited. (For an explanation of these options, hover over the ‘i’ icon).
If you choose one of the options other than “Not Allowed”, the following additional configurations will be shown for you to select:
- The language the emails in which will be sent
- Whether to send the emails from the Current User’s email, the System Default email, or a custom email
- To add Bcc addresses. For an explanation of this option, hover over the ‘i’ icon.
Case Map
Finally, you can choose whether and how existing cases appear within the Case Map.
- You can choose if you want to enable a layer showing Existing Cases when creating a Case.
- You can choose if you want the layer to be shown by default.
Creating or Deleting a Case Office
Certain activities that relate to individual Case Offices can only be managed by system users with permissions to manage the entire domain, i.e. domain administrators or system administrators. These include creating or deleting the Case Offices themselves.
Creating a Case Office
To create a Case Office, select Case Work from the top-most navigation bar, select the Case Office Administration tab, and click Create from the left-hand navigation menu.
Fill in the Name of the Case Office and any other information you need. Once you have done this, click Save to complete the creation of the new Case Office.
Deleting a Case Office
To permanently delete a Case Office, select Case Work from the top-most navigation bar, then select the Case Office Administration tab. If you have access to more than one Case Office, select Find from the left-hand navigation menu to bring up a table showing all the Case Offices that exist in your domain.
From the Table, select the Case Office you wish to delete, and you will be presented with the profile for this Case Office.
Click the Options button on the bottom-left of the page and select Delete Case Office. Because this is a permanent action that will remove the Case Office and all files and associations, you will be asked to confirm that you wish to proceed. Click Confirm Delete and you will be further asked to type in Confirmation Text. Finally, if you click Confirm Delete, the Case Office will be removed from the application database.
Managing Staff
The Staff section is used to assign users who will support Case Work within the current Case Office. To be available for assignment, these users will first need system user accounts with an “Office” role, i.e. Office Administrator, Office Staff or Office Basic.
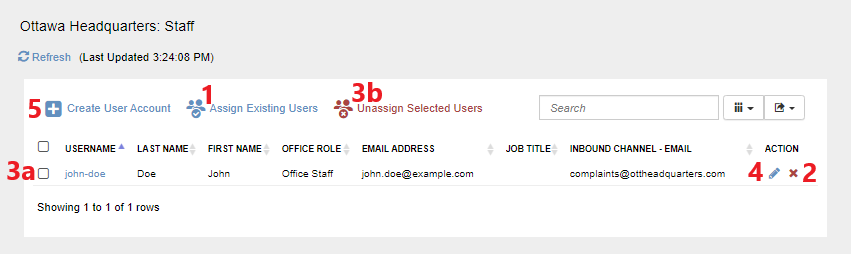
- To assign staff to the Case Office, select ‘Assign Existing Users’ at the top of the office staff table.
- To un-assign staff that should no longer have access to the Cases for this Case Office, select the ‘X’ icon on the right side of the table.
- Alternatively, you can remove multiple users at once by selecting the checkboxes (3a) on the left side of the table to specify the users and then click on ‘Unassign Selected Users’ (3b) at the top of the table.
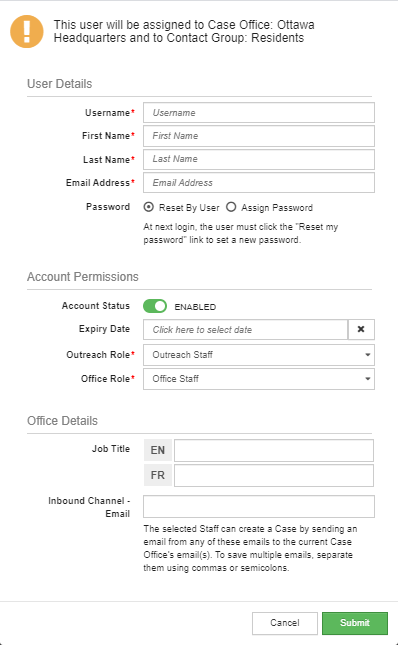
- You can also select a staff member from the table and click the edit (i.e. pencil) icon to optionally add a job title and, if the case office is set up with email-based inbound channels, specify email address(es) for which cases will be accepted. The selected staff can create a case by sending an email from any of the email addresses to the current Case Office’s email(s). To save multiple emails, separate them using commas or semicolons.
- You can also Create a User account by selecting the + button. The Create User Account form should be displayed. Enter the User Details, the Account Permissions, and the Office details. Then Click the green Submit button at the bottom right of the form to save the new User.
For a more thorough explanation of managing Users, visit our support article Managing Users.
Purging a Case Office and Bulk Reassigning Cases
As a Case Office or Domain Administrator, it might be desirable to periodically clean up and permanently remove all the deleted Cases for a given Case Office. You may also want to bulk reassign all Cases from one Staff member to another. To do either of the above, go to the desired Case Office. You will see an Options button on the bottom left of the page. Clicking it gives you two options: Purge Case Office and Bulk Reassign Cases.
Purging a Case Office
Because this is an action that will permanently remove the Cases, you will be asked to confirm that you wish to proceed. Click Confirm Purge and the deleted files will be removed from the application database.
Bulk Reassign Cases
To bulk reassign all Cases from one Staff member to another, simply select the current and new assignees and click Save. Note that this option is also available when searching for Cases.
Administering ArcGIS Layers
If you are using the optional Esri ArcGIS module, you will see an option for configuring the ArcGIS Layers that appear in your Case Office maps as well as how these are displayed. For details, see ArcGIS Layer Use.